When planning for a wallpapering project, it is important to gather the needed information for a perfect result. A step by step guide of installing wallpaper will always be a must-have handbook for an efficient installation process, however, sometimes the greatest tips can come from making mistakes and learning from them - how not to do in the future. To avoid making mistakes and learning from them in your next wallpapering project, in this blog post we will be sharing three of the biggest wallpapering mistakes to avoid.
1. Not Smoothing Out Bubbles/Wrinkles During Installation

One common mistake during wallpapering installation is not smoothing out the wallpaper during the application, but doing it after a panel or the whole wall has been finished. This can result in a wrinkled wallpaper and uneven pattern repeat. Because of any air bubbles or wrinkles the wallpaper panel can be in a different length than the wallpaper panel that will be added right next to it. Therefore, it can be hard or even nearly impossible to get a perfect pattern match and butt the seams tightly next to each other.
To avoid this mistake use a soft smoothing tool to carefully and gently smooth out the wallpaper from any air bubbles that might have formed from the middle out to the sides of the wallpaper panel during the panel installation. This then will ensure that each wallpaper panel is applied evenly and a picture perfect look is achieved. In the photo above we can see an example of carefully applying each wallpaper panel and smoothing it out as you go by Kait, where she is applying our Neutral Color London Metro Lines Removable Wallpaper with a helpful hand by her side to achieve a beautiful result. To learn more about our wallpaper installation, visit our How-To Wallpaper Installation Video page for a step by step guide.
2. Using Any Smoothing Tool
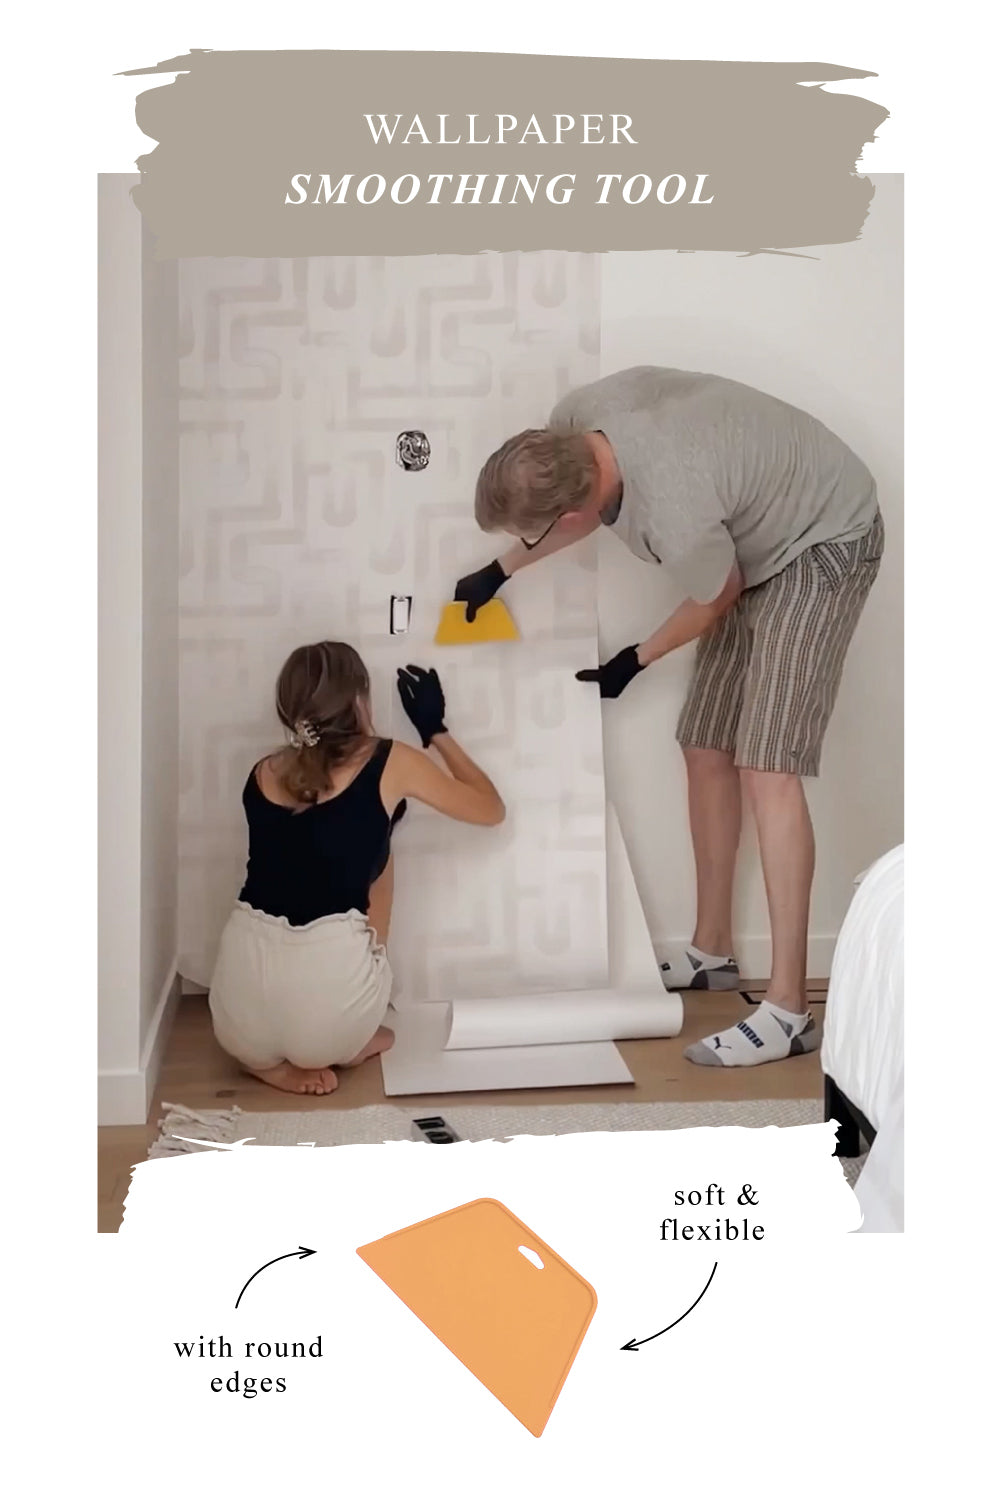
Picking the right smoothing tool for the job can be more important than it might be thought. A common mistake is using any smoothing tool that can be rough with sharp edges or a smoothing tool that can be tough on wallpaper material, especially smooth wallpaper materials. Using the incorrect smoothing tool that might not be flexible or soft enough can accidentally damage the wallpaper during the installation process. The nightmare of any wallpapering project is, smoothing air bubbles with a sharper squeegee and tearing or scratching the wallpaper.
To avoid this mistake, we recommend always choosing a smoothing tool with round edges and a soft, flexible press on part to gently smooth out any wrinkles and air bubbles. Above we can see a perfect example of the smoothing process during our Neutral Color London Metro Lines Removable Wallpaper panel installation by Kait. It is always easier and more fun to achieve a beautiful result with a helpful hand as this allows to smooth the wallpaper as you go and ensure a perfect pattern match with every added panel.
3. Cutting The Wallpaper Before Installation


To avoid this mistake, when ordering wallpaper, we recommend to order the wallpaper in height that is slightly longer than the total length of the wall as well as an amount that gives some excess wallpaper on the sides. As ceilings can start to bend up or down and sides of the wall are not always straight as well, having the right amount of wallpaper will ensure that you have enough material to leave some excess wallpaper on top and bottom for trimming after the installation for a perfect pattern repeat and surface coverage as seen in the photo above. In the photo above, we can see a gorgeous wallpapered slanted wall by Kait showing us a beautiful pattern repeat with each panel added. To find out the wallpaper amount needed for a slanted wall and other types of wall wallpapering, visit our How To Measure Your Wall page.
We hope this blog post will give you some tips and mistakes to avoid for an efficient and stress-free wallpapering installation process and an eye-catching result. To find out more about mistakes to avoid when wallpapering, visit our other 3 Biggest Wallpapering Mistakes blog post.